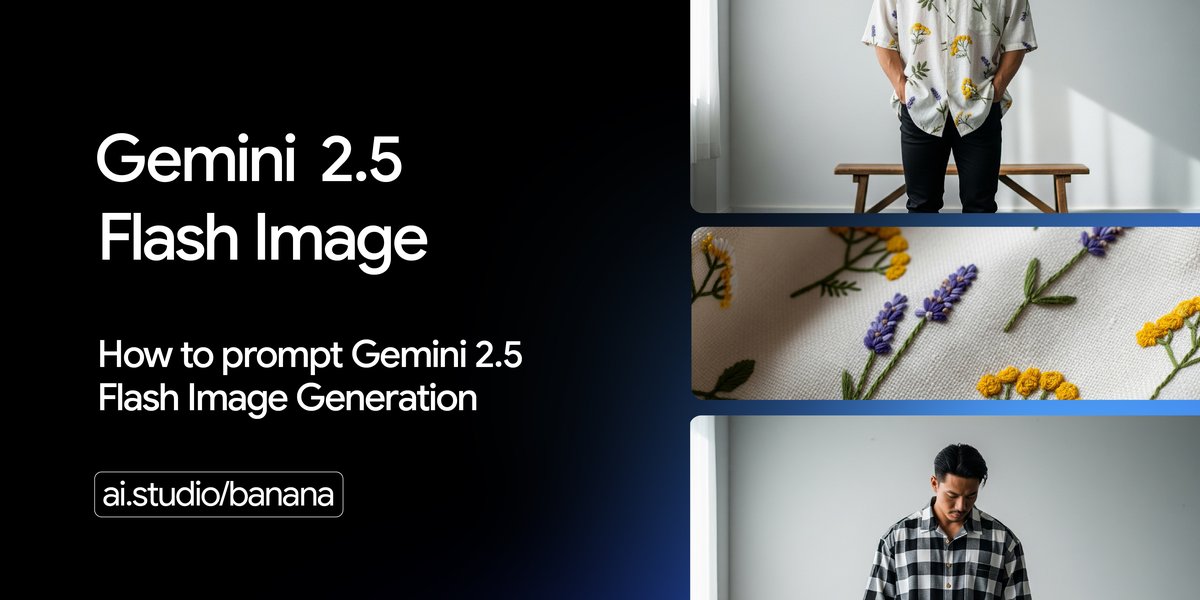
Key Summary Gemini 2.5 Flash Image is Google's latest multimodal AI model that understands and processes both text and images simultaneously. This guide introduces step by step how to write prompts that produce the most natural and polished images, and how to efficiently leverage image editing and compositing capabilities. It covers the most important prompting principles, tips for each use case, points to watch out for, and reference resources.
1. Features and Core Capabilities of Gemini 2.5 Flash Image
The most distinguishing feature of Gemini 2.5 Flash Image compared to existing AI models is its ability to understand text and images together, naturally. Rather than simply generating images, it excels at multimodal capabilities such as continuously refining images through conversation, combining multiple images, and naturally embedding text within images.
Key capabilities include:
- Text to Image: Generate high-quality images from text descriptions alone
- Image + Text to Image (Editing): Add/remove/modify elements in images and adjust style and tone
- Multiple Images to Image (Compositing and Style Transfer): Combine multiple images to create new scenes
- Iterative Refinement: Gradually refine images through multiple rounds of conversation
- Text Rendering: Generate images with clearly embedded text for posters, diagrams, logos, etc.
"Describe the scene, don't just list keywords. The model's true strength lies in its deep language understanding. Narratively described sentences always produce more coherent and superior images."
View Official Developer Documentation
2. Creating Images from Text Alone: Detailed Scene Description Is Key!
2.1 Photorealistic Images
If you want images that are as vivid as photographs, it's important to describe them like a photographer would, including camera angle, lens, lighting, and details.
"A realistic close-up portrait of an elderly Japanese ceramicist with deep wrinkles from years in the sun and a warm, knowing smile. He is carefully examining a freshly glazed tea bowl. In a workshop where sunset light gently enters through a window, shot with an 85mm lens for soft background blur (bokeh), an atmosphere of tranquility and craftsmanship. Vertical portrait."

2.2 Stylized Illustrations/Stickers
When you want stickers or icons, you need to be specific about style, outlines, shading, background, and colors to achieve consistent quality.
"A cute kawaii-style sticker of a happy red panda wearing a tiny bamboo hat and crunching on a green bamboo leaf. Bold, clean outlines, simple cel-shading, vivid color palette. Background must be white."

2.3 Accurate Text Rendering in Images
For images that include text such as posters and logos, you should also specify the font, placement, and design style.
"A modern minimalist logo for a coffee shop called 'The Daily Grind.' The text is in a clean, bold sans-serif font. A coffee bean icon is naturally integrated with the lettering. Colors are black and white."
![]()
2.4 Product Mockups/Commercial Photography
For professional product photos, clearly describing the type of lighting, background, angle, and details to emphasize is effective.
"A high-resolution studio photo of a matte black ceramic mug placed on concrete. Three-point softbox lighting for soft highlights and shadow elimination. Shot from a slightly elevated 45-degree angle to emphasize clean lines. Focus on the steam rising from the coffee. Square composition."

2.5 Minimalist/Negative Space Design
For simple backgrounds to place text over, specify the subject position, wide empty space (negative space), and soft lighting.
"A minimalist composition with a single red maple leaf placed in the lower right of the frame. The background is a nearly empty off-white canvas with negative space reserved for text. Soft light from the upper left. Square."

2.6 Sequential Panels (Comics/Storyboards)
For vivid comics and storyboards, you need to include specific details about each panel's style, protagonist, action, background, lighting, and dialogue.
"A hardboiled noir comic-style panel. In the foreground, a detective in a trench coat stands in the rain under a flickering streetlight. In the background, the neon sign of a lonely bar is reflected in a puddle. Caption at the top: 'The city was a rough place to keep secrets.' Lighting is harsh and dramatically somber. Horizontal panel."

3. Various Editing and Compositing Features Using Images
Now it's time for Gemini 2.5 Flash's true multimodal capabilities to shine! You can input images and directly instruct desired changes, combinations, and even style transformations with simple text.
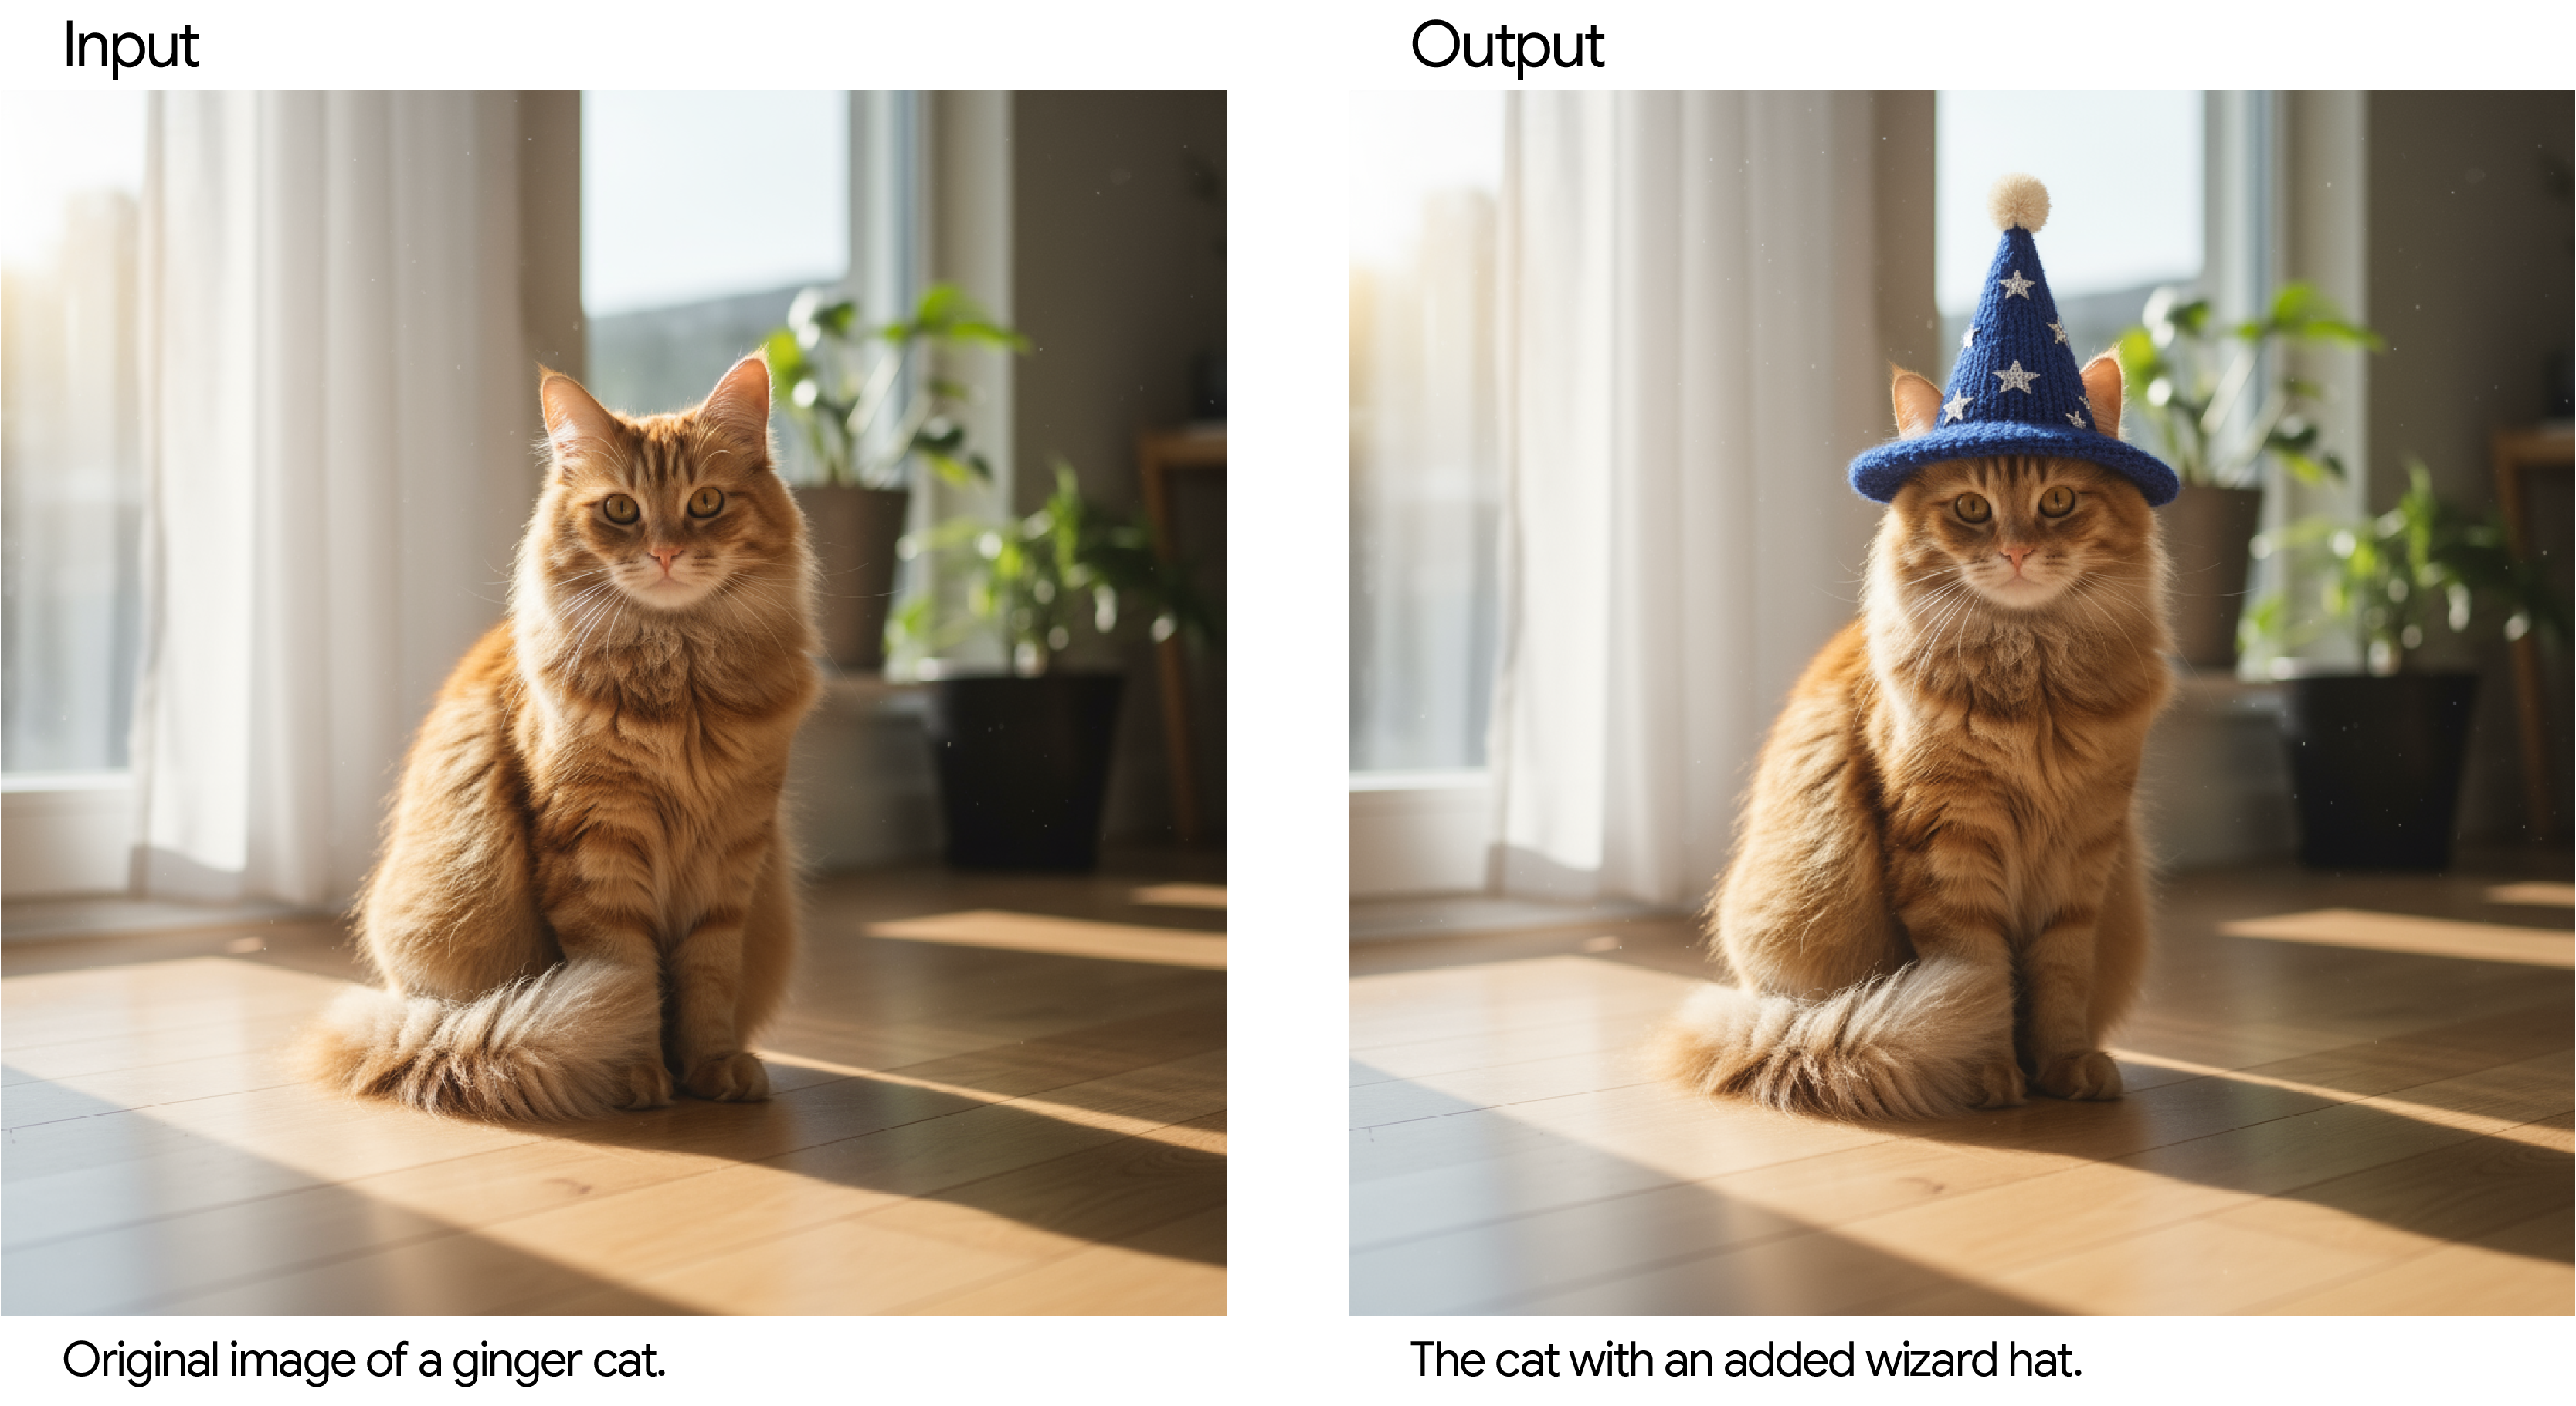
3.1 Image Editing: Adding/Removing Elements
By describing only the elements to change based on the input image, the original style and consistency are maintained.
"Put a small knitted wizard hat on my cat's head. Make sure the hat looks natural and blends softly with the lighting."
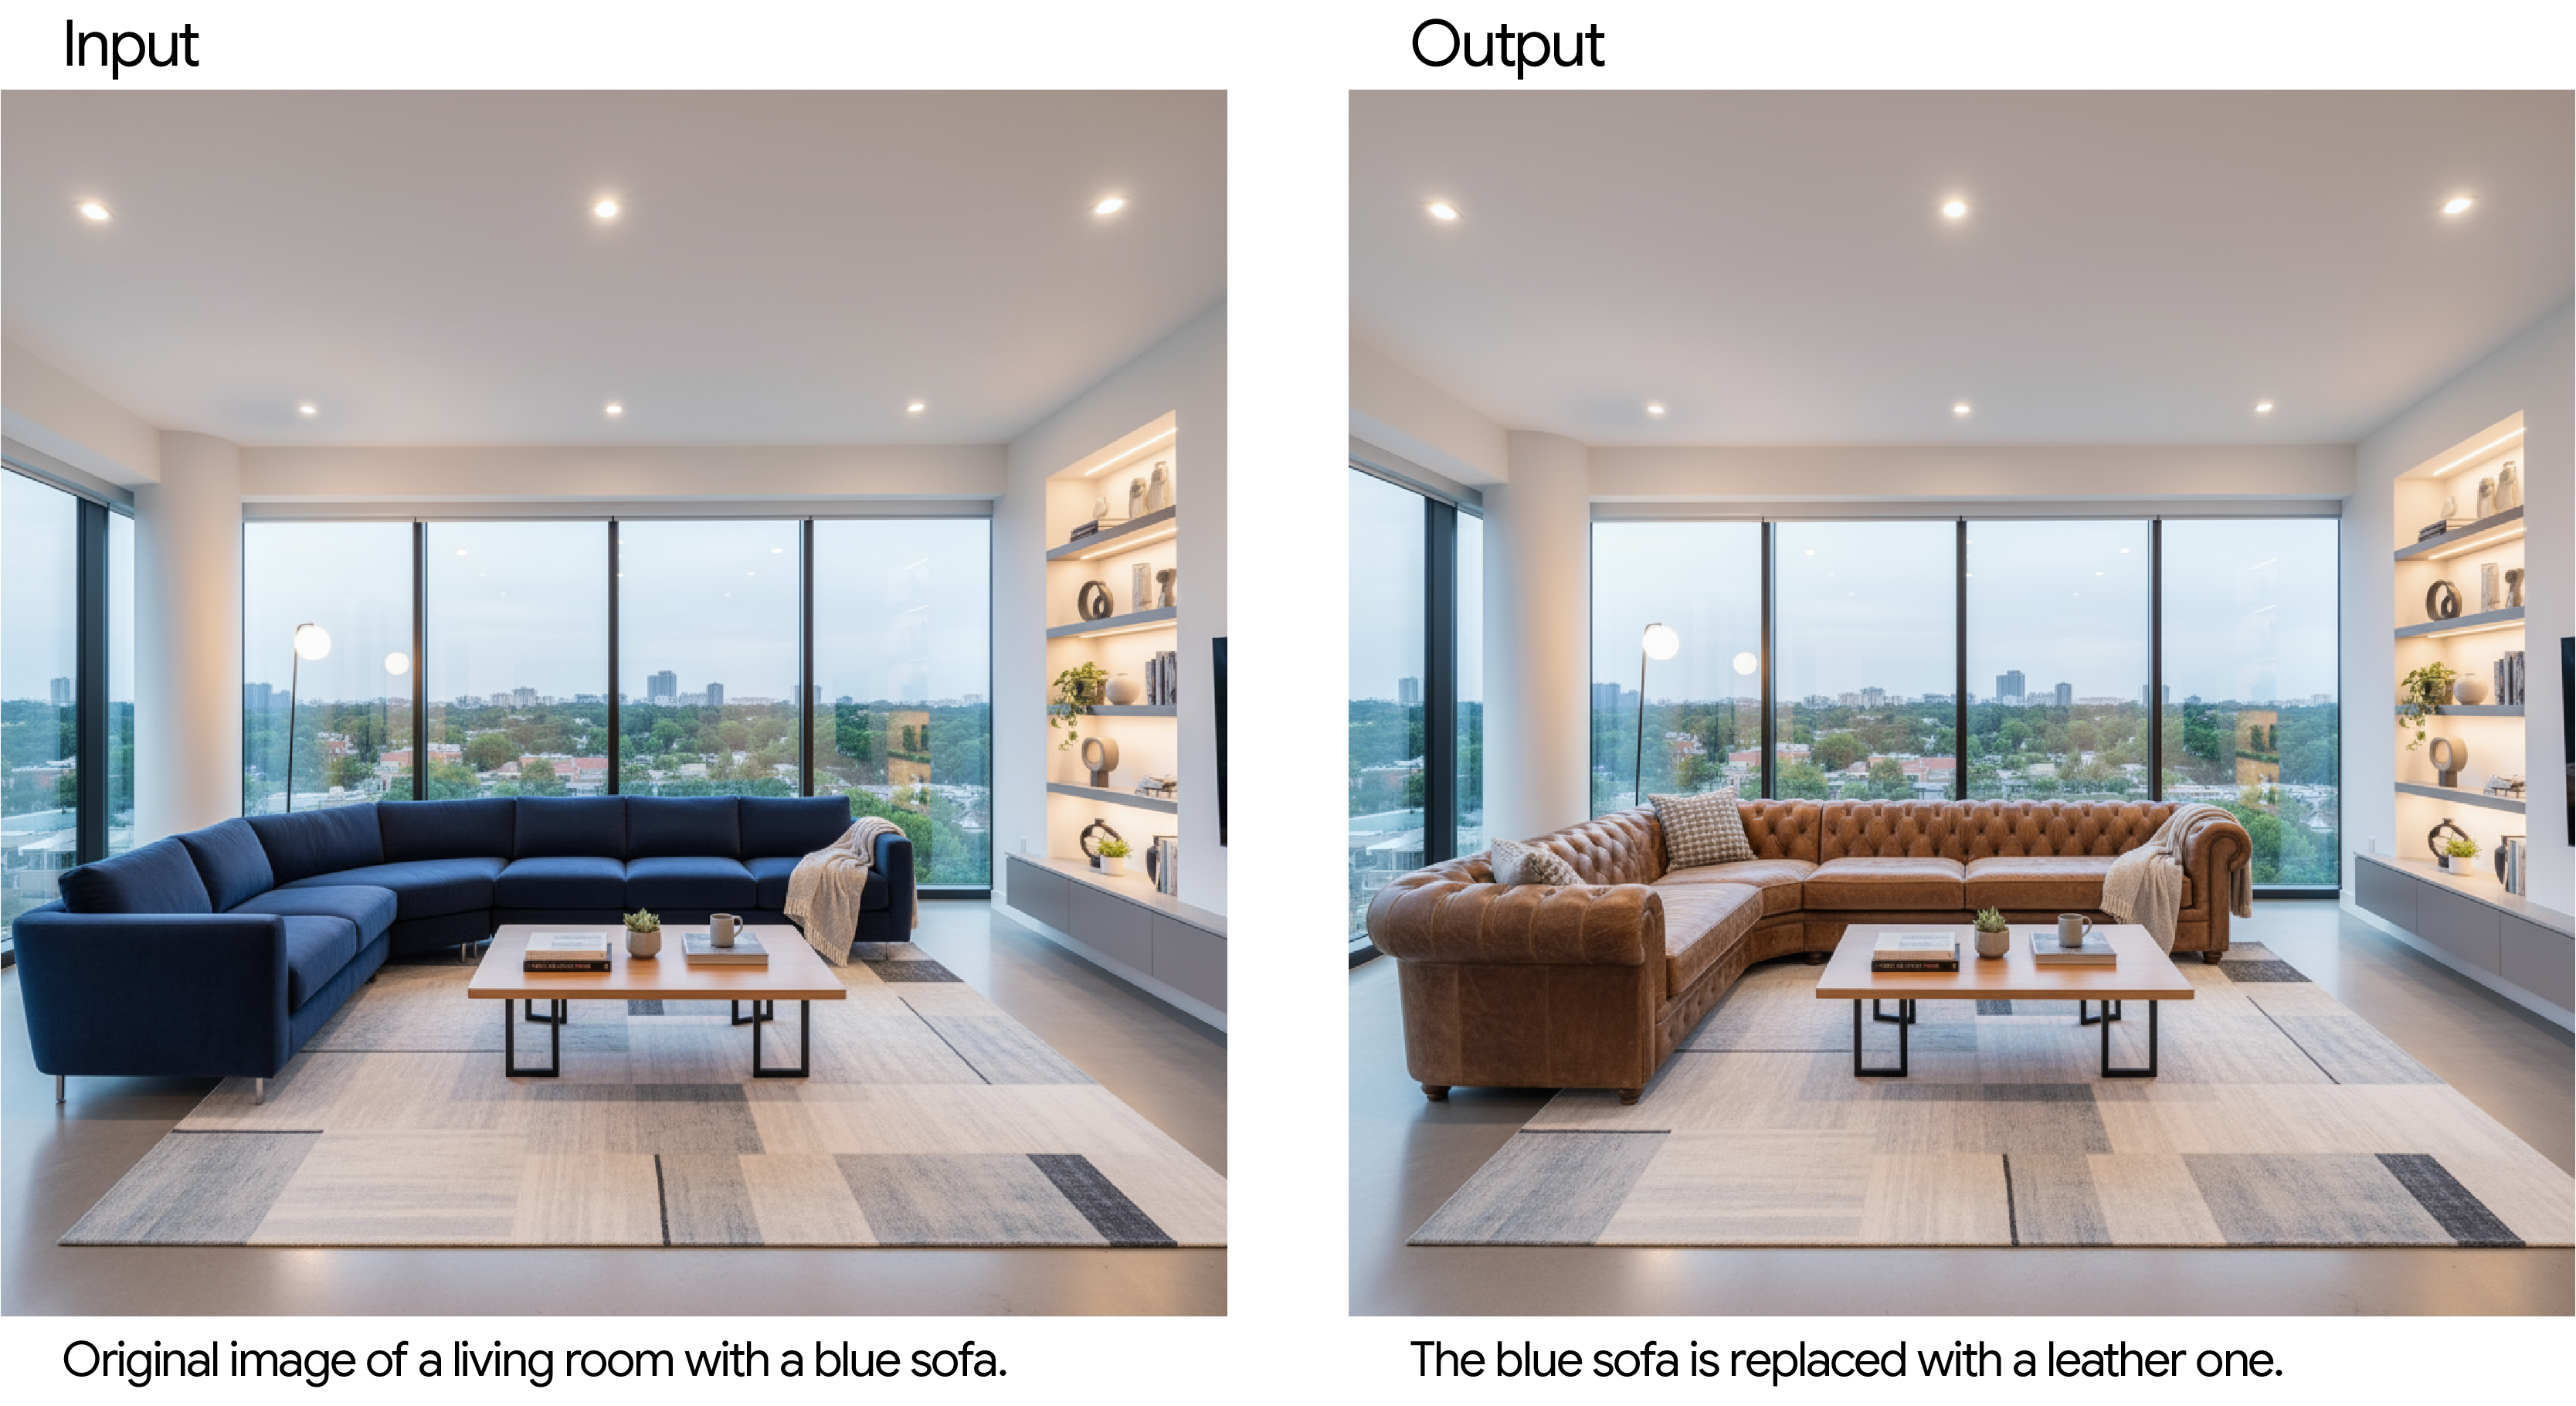
3.2 Inpainting (Modifying Only Specific Parts)
Changing just one part while keeping everything else intact is also very easy.
"In this living room photo, replace only the blue sofa with a vintage brown leather sofa. Keep the cushions, lighting, and everything else exactly the same."
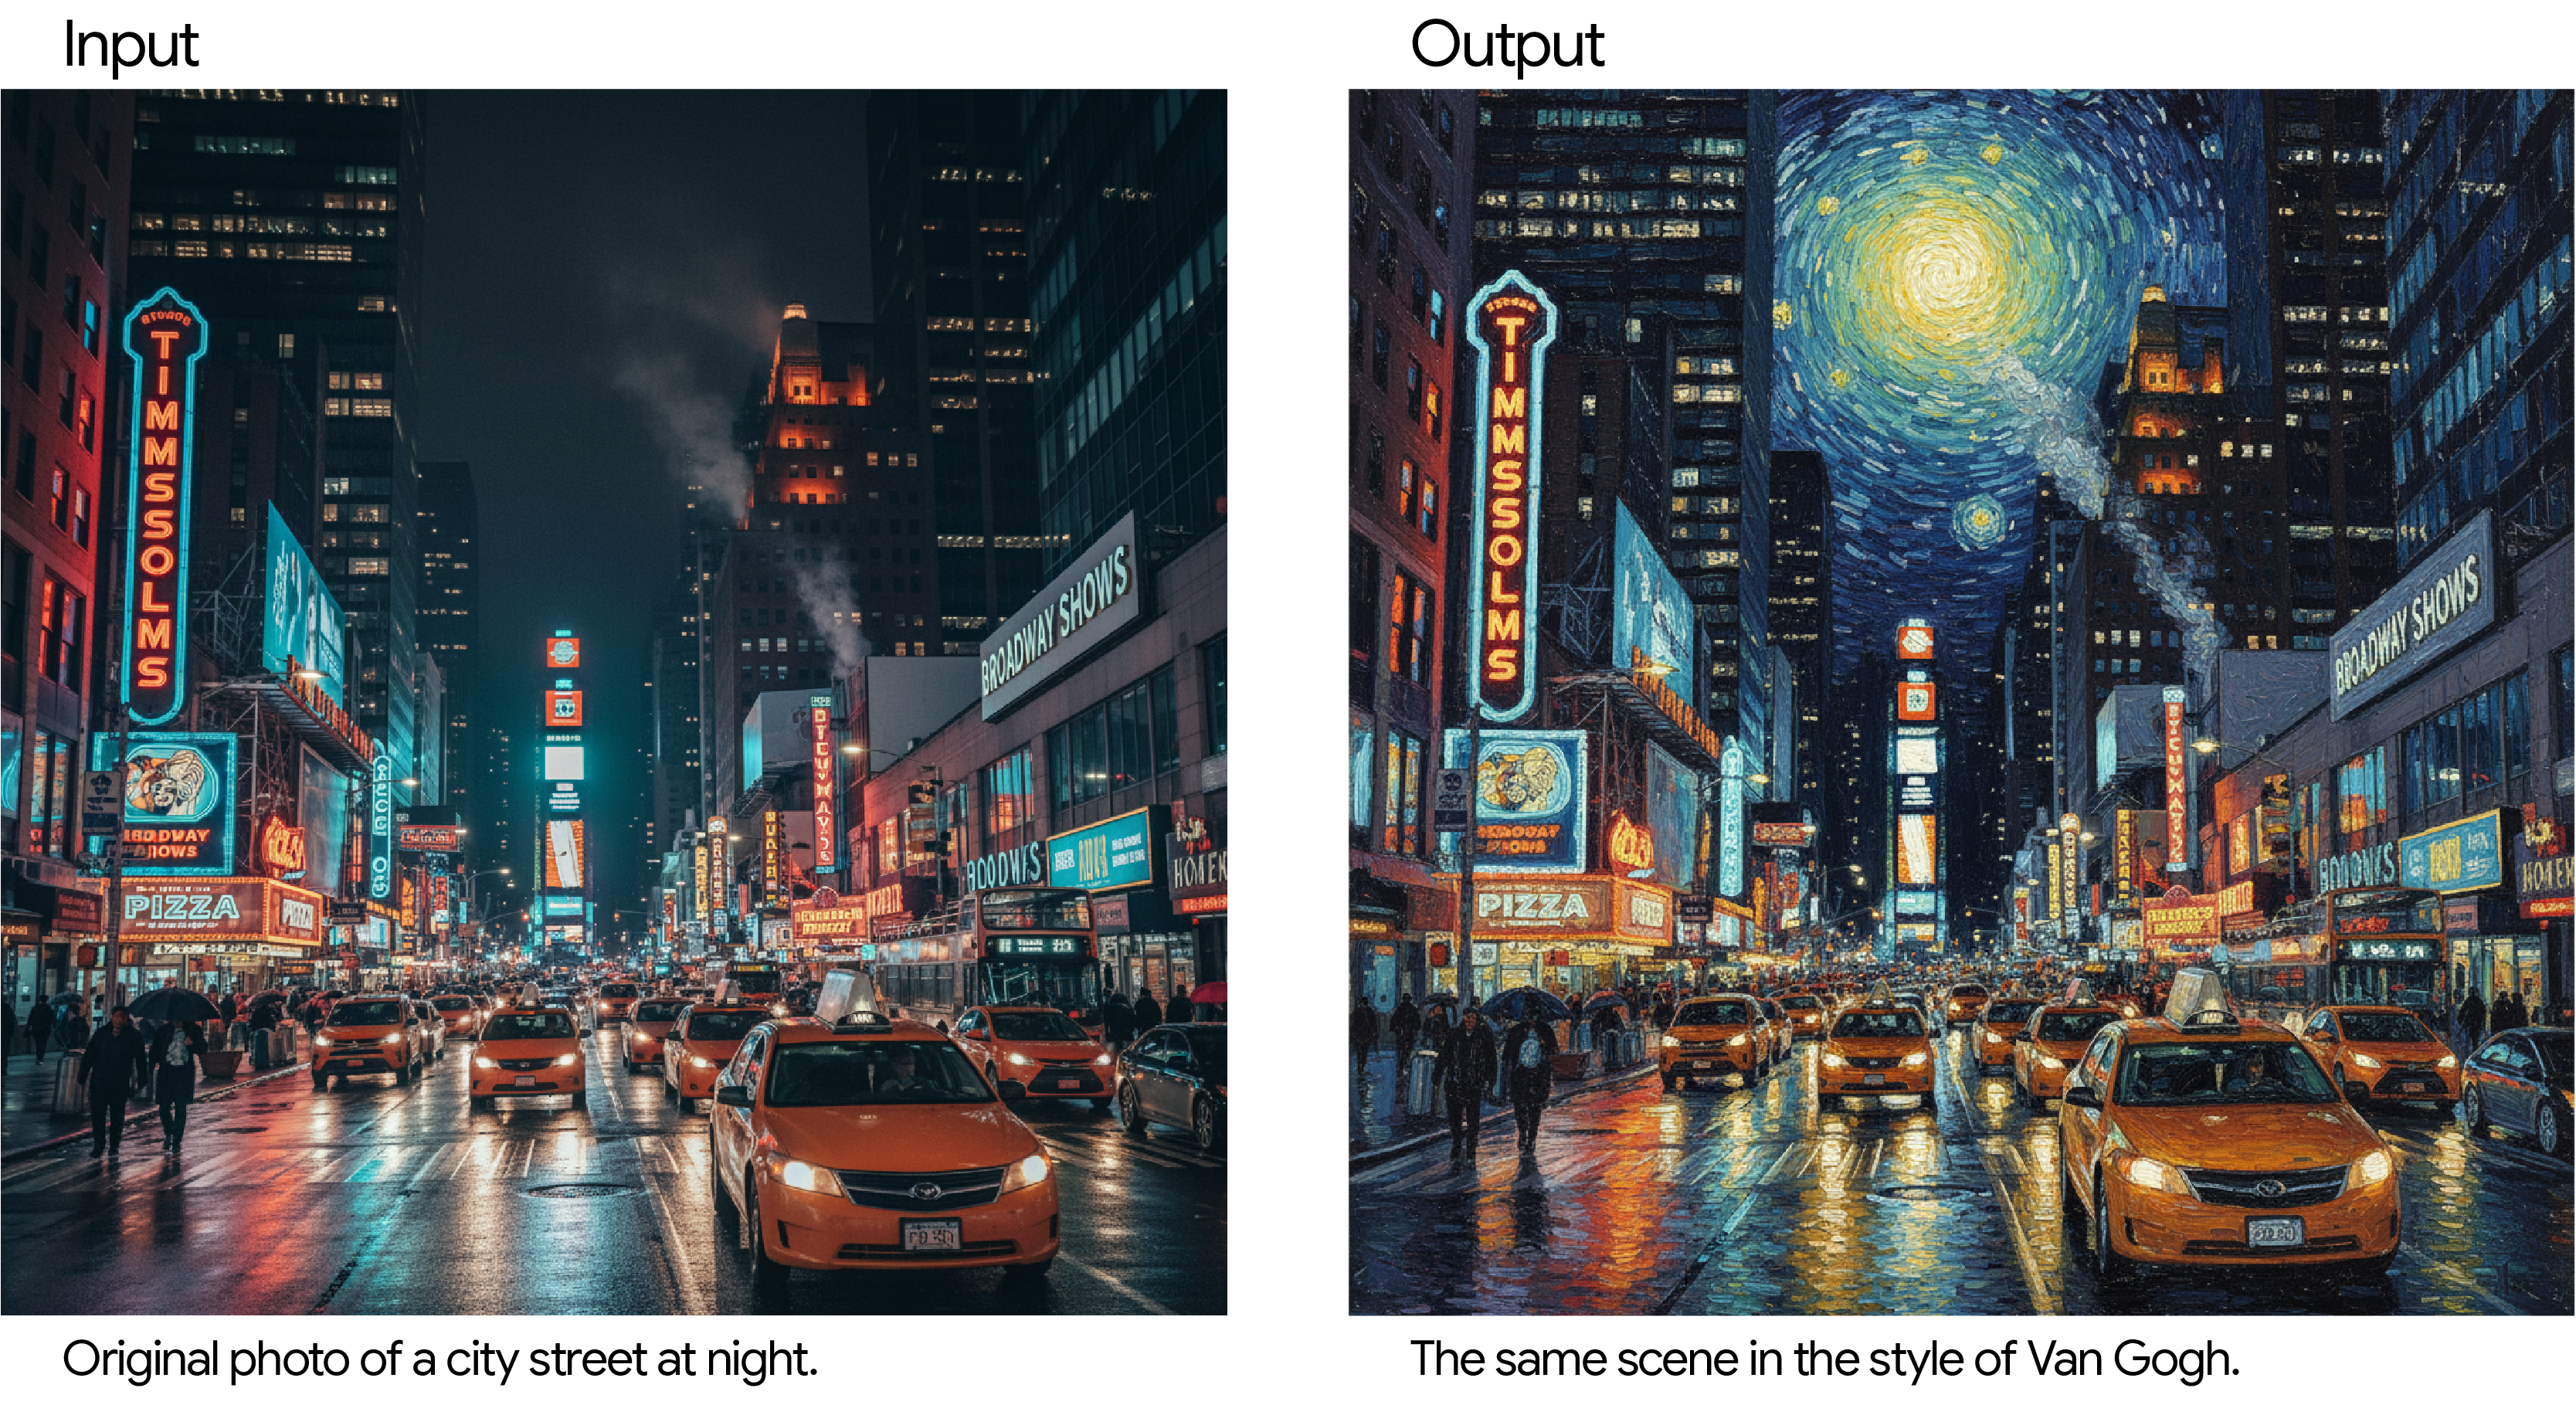
3.3 Style Transfer
You can transform photos into your desired artist's style or art movement.
"Transform this modern nighttime city street photo into the style of Van Gogh's 'Starry Night.' Maintain the original composition of buildings and cars, but apply swirling impasto brushstrokes and intense blue and yellow colors."
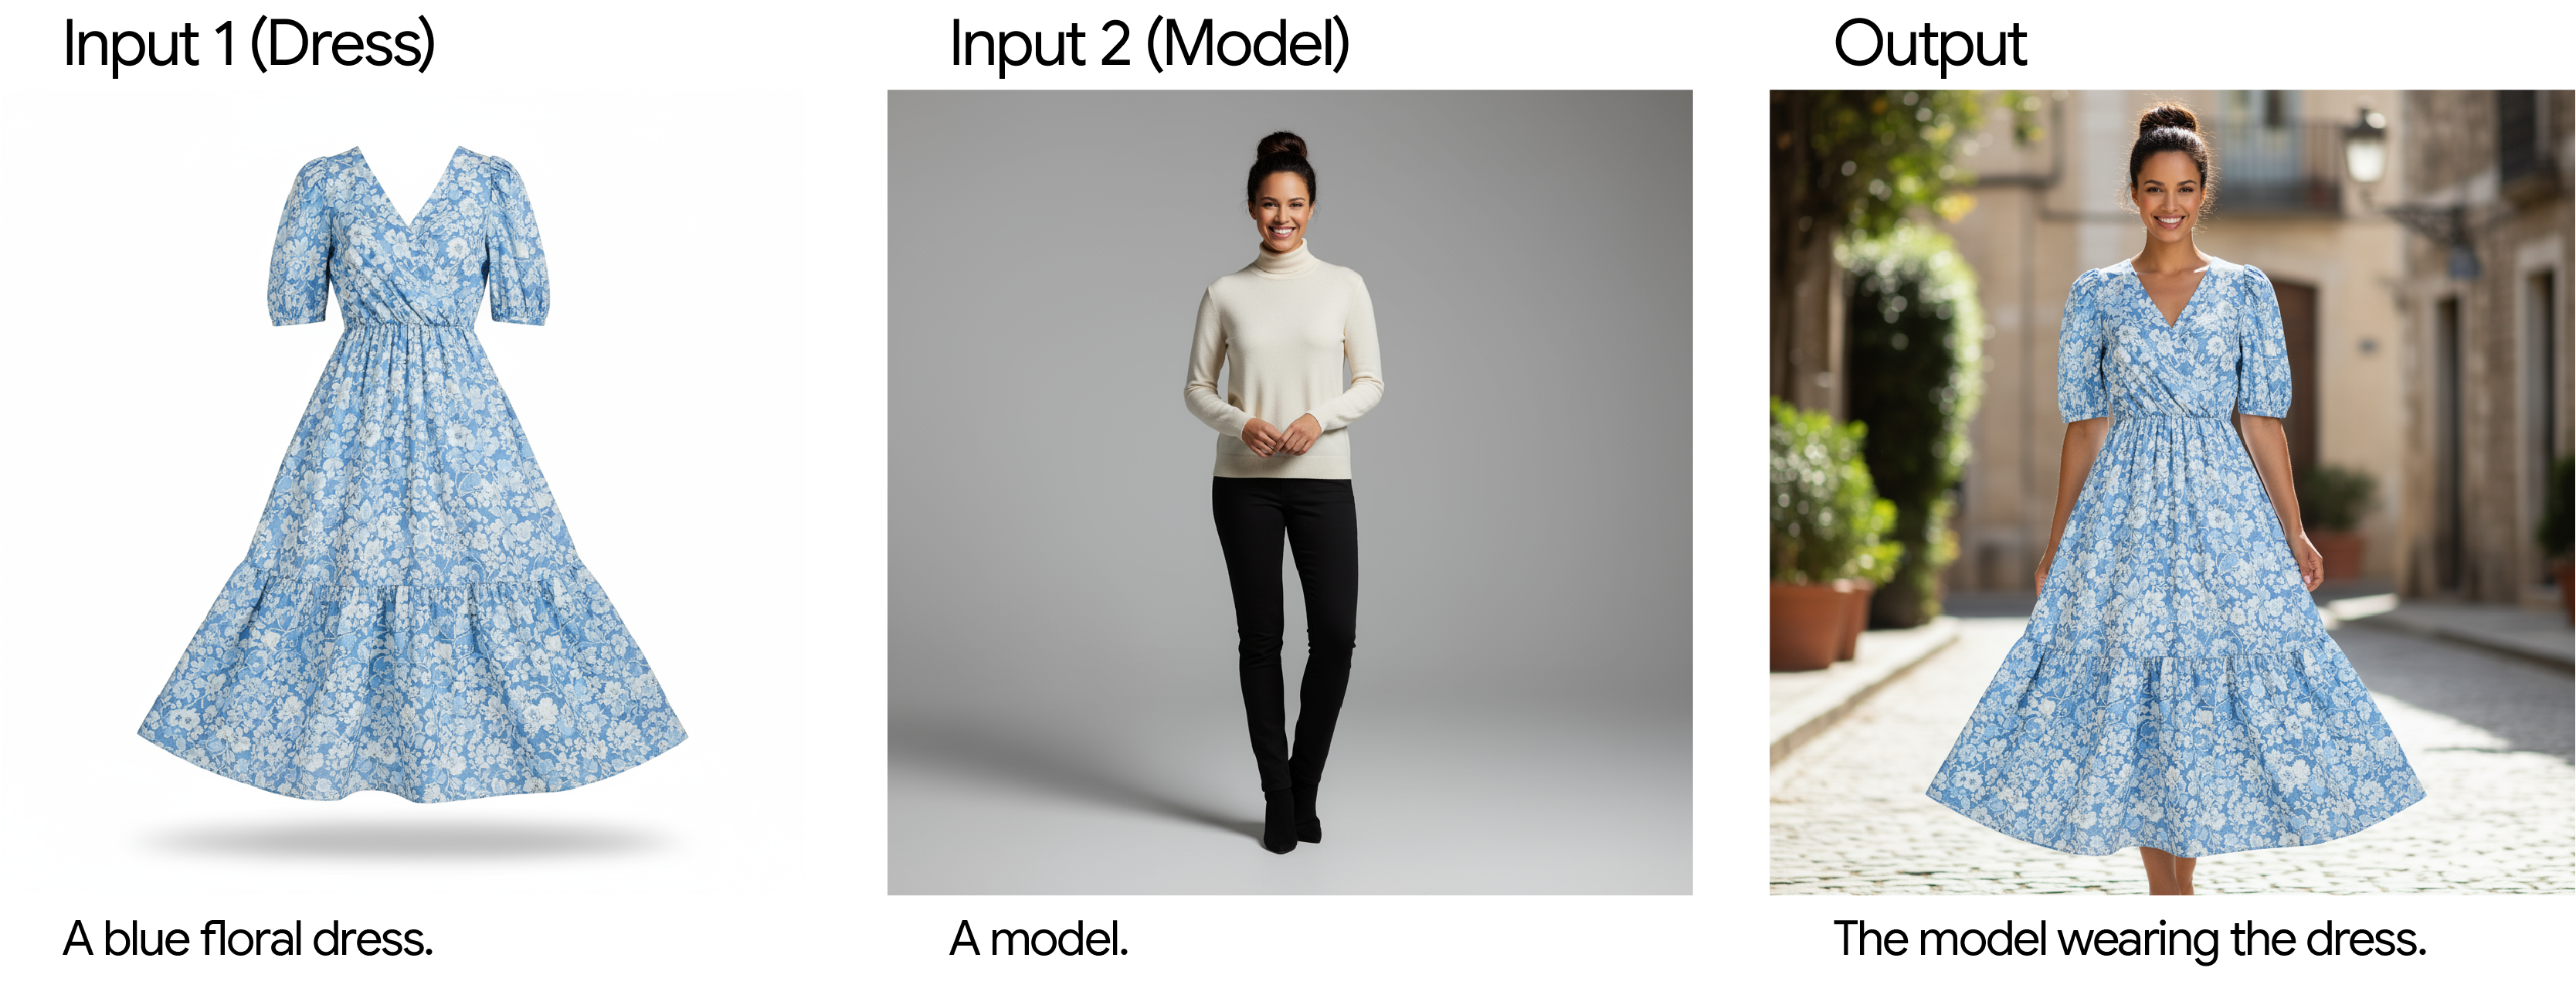
3.4 Advanced Compositing: Combining Multiple Images
You can combine two or more images to create entirely new scenes.
"Have the woman from the second image wear the blue floral dress from the first image. Composite it like a real fashion photo with natural outdoor lighting and shadows."
4. Best Practices for Writing Prompts to Get the Best Results
4.1 Specificity Equals Quality
-
Describe with great specificity:
Instead of "fantasy armor," add details like "intricate elven plate armor with engraved silver leaf patterns, a sleek neck guard, and hawk-wing shaped pauldrons as accents!"
-
Provide context and purpose:
Describing how the image will be used, such as "Generate a logo for a high-end minimalist skincare brand," significantly improves results.
-
Iterative refinement
"I'd like the lighting to be a bit warmer." "Everything looks good, but please make the expression just a bit more serious." Make requests conversationally like this.
-
Conversations for maintaining consistency If certain character features change after multiple rounds of image editing, simply re-describe the details in a new conversation.
-
Negative prompts:
When you want something like "an empty street with no cars," phrasing it as a positive description like "a completely deserted street with no trace of traffic" is more effective than saying "no cars"!
-
Aspect ratio control: Gemini basically preserves the input image ratio during editing, but if it doesn't work properly, add "Do not change the aspect ratio of the input image under any circumstances" to your prompt.
-
Use photographic and cinematic language: You can precisely control image composition using actual shooting terminology like wide-angle shot, macro shot, low-angle, 85mm portrait, Dutch angle, etc.
5. Limitations and Ongoing Improvements
No matter how powerful the model is, it's difficult to achieve 100% perfect results on the first try. In particular, complex typography and character consistency across multiple rounds of image editing may require additional instructions or multiple prompt attempts.
"The more subtle and complex the request, the higher the quality becomes through iterative adjustments. Fueled by your creativity, we will continue to build even better imaging tools together!"
6. Next Steps: Start Creating!
You now have the fundamentals to create amazing images with Gemini 2.5 Flash Image. Try practicing or applying them directly to development with the resources below.
- Practice with Gemini in Google AI Studio
- Check the official documentation for development integration
- Review the pricing policy
- Try the AI-based image editing Applet
Conclusion
By using this guide, writing prompts and utilizing images that draw out the full potential of Gemini 2.5 Flash becomes much easier. Simply describing scenes in detail and kindly explaining the purpose or intended use is enough to achieve much richer and more consistent results. Don't be afraid of small experiments and iteration. With consistent practice, you'll develop your own creative prompt-writing secrets